|
|
| Click this image to enlarge |
Workspace Buttons Overview
The menus and buttons above the workspace on the Concept Map Builder (CMB) are described from left to right below.
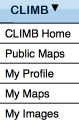
The CLIMB drop-down menu contains the following links:
The CLIMB Home link takes you to the CLIMB home page. The Public Maps link takes you to a list of
published maps created by CLIMB users. The My Profile link takes you to your CLIMB profile. The My Maps button
takes you to a list of your own maps. The My Images link takes you to your list of images in My Maps Manager.
The File drop-down menu (present in Build Mode only, see below) provides options for opening and saving your concept maps and contains the
following links:
Clicking on the New Map link opens a new concept map as a new tab in your workspace. The Open Map link opens a list of your
existing maps for editing. The Save link provides you with options for saving your current concept map.
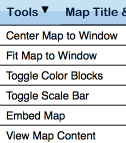
The Tools drop-down menu provides options to change how your map is viewed:
|
Center Map to Window will center your concept map in the window.
Fit Map to Window will re-zoom your map so that all of your concepts are visible.
Toggle Color Blocks will reveal or hide the color blocks for your concept map.
Toggle Scale Bar will reveal or hide the scale bar (used for zooming).
Embed Map will provide the code necessary for embedding your map on another website
View Map Content will produce a list of concepts and descriptions contained on your map.
|
The Map Title & Description button allows
you to add a title and description to your concept map. The title and description are saved when your concept map is saved.
The toggle Tool Tips button allows you to view tips on how to use our tools. When ON, hover over any tool to view the tip. Turn this
button OFF to disable this feature.
The AutoSave button automatically saves your work. Click on the white checkbox to enable this feature. You may adjust the save time by
clicking on the up/down arrows. The default save time is once every five minutes.
Click on the Build button to activate the Build Mode,
where you can create and edit concept maps. When opening a new or existing map, you begin in this mode.
Click on the Present button to activate the Present Mode.
Present mode is read-only, and includes presentation-friendly tools such as the ability to zoom to sections of the map and to toggle
concepts by color.
The following tools are available in Build Mode, for use in creating and editing a concept map. They are not visible in Present Mode.
Click to turn on the Multi Select button then click or draw a rectangle around objects in your concept map to edit or move them together.
The Edit History button allows you to view a list
of recent changes to your concept map. You may revert back to any version by clicking on the time stamp. Click the x to the right of the time stamp
to delete this version.
Click on the Concept button to create a concept. Select the shape
from the drop-down menu, then double click anywhere in the workspace to insert the concept icon.
Click on the Line button to create a line. Select the line type
from the drop-down menu (straight, curved, or forked), then double click anywhere in the workspace to insert the line.
Click on the Text Box button then double click on the workspace to add a text box
to your concept map. Double click the text box to replace the default text with your own.
The Grid button turns grid lines on and off.
The Library button opens a window containing
your library of saved images. Click on any asset and drag to a concept to attach it to your concept map. Close this window by clicking on the
x in the upper right.
The Asset Search button opens a keyword search text box
for assets. After typing in a keyword, click the magnifying glass icon to initiate the search. Any assets found will appear in a
list on the left side of your
screen. Click on any asset and drag to a concept to attach it to your concept map.
Previous | Next | Index
|
)


)
)
)
)
)
)
)
)
)
)