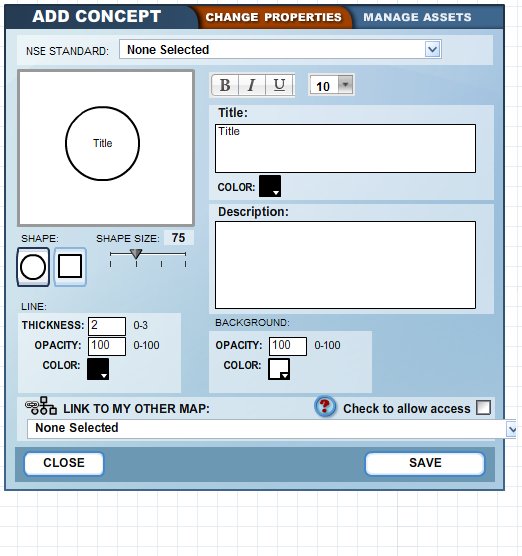
The concept editor is used to add a concept to your Concept Map Builder (CMB) work space, change a concept's properties, and manage assets. Asset management (beginning with the search function in this tutorial) and editing objects, including concept properties, are described later in this tutorial. The options for adding concepts are described below.
NSE Standard: A drop down list containing the National Science Education (NSE) Standards that can be associated with a concept. This selection allows color-coding of the concept map according to NSE Standards (click here to see how concepts are thus colored in the COSEE-OS Ocean Climate Interactive tool). At right, roll over the list to see its contents. On the CMB, click the down arrow to open and close this list. NOTE: Concepts do not need to be tied to NSE standards. Title: On the CMB, enter a title for your concept in the Title textbox. At right, roll over the "Title" box to see an example. You may alter the appearance of text using the B (bold), I (italic), and U (underline) buttons, and by selecting a font size in the drop down menu (font size defaults at 10px; roll over the drop down menu to see 14px). Note that the concept builds in the large square at left so you can see how it looks as you go. Color: On the CMB, click on the color block to select a color for your title text. Roll over the "Color" box in the above image to see an example. Description: On the CMB, enter a description of your concept in the "Description" textbox. Roll over the "Description" box in the above image to see an example. Shape: There are two options: circle or square. On the above image, roll over the circle and square to see how these elements change the shape of a concept. Shape Size: Use the slider bar to adjust the size of the circle or square. On the above image, roll over the "75" to see how increasing the size from 75 to 100 affects the concept. Line: This adjusts the thickness, opacity and color of a concept's outline. On the CMB, select a line thickness between 0 (none) and 3 (thickest). Opacity changes (from 0 to 100) will adjust the intensity of the line. Click on the color block to select a line color. On the above image, roll over the "Line" box to see an example of a square concept with a thick purple outline at 40% opacity. Background: This adjusts the opacity and color of a concept's background. On the CMB, select an opacity between 0 (no fill) and 100 (intense color). Click on the color block to select a background color. Roll over the "Background" box on the above image to see an example of a square concept with a yellow background at 30% opacity. Link to my other map: You may create links from concepts within this map to other concept maps that you have created. Click on the drop-down menu to select another map to link to. Check the "allow access" box if you would like others to be able to open that map directly. Save: To save the concept to your map, click the SAVE button. Roll over the "SAVE" button on the above image to see how the concept would look on the CMB work space. Close: To discard the concept, click the CLOSE button. Previous | Next | Index | |||||||||

